
Pre-/Postflight
- Please be careful with all static wicks sticking out from trailing edges before and after flight – accidentally striking or bending may break them, which will cause the aircraft to be deemed VFR-only or even entirely grounded until it gets fixed!
- The pitot heat cover is important to be installed every time the aircraft is parked.
It should always be the first item to remove when you get to the plane for a flight, and the last item to be installed after completing all other postflight tasks so that the cover cannot be melted by the pitot heat – yes, that has happened…- Please also install the engine inlet plugs after your flights, and whenever the sun is out, the sun shield (see this page for more information).
It’s a good idea to always assume that the next scheduled flight may be cancelled, and you always want the aircraft to be protected as much as possible.
- Please also install the engine inlet plugs after your flights, and whenever the sun is out, the sun shield (see this page for more information).
- Avionics: There are three extra checks that are highly recommended before every flight once the avionics master switch is on:
- ESP – if you are planning on maneuvering, turn ESP OFF
- Otherwise it will activate the AP and take over control of the plane in the middle of your maneuvers!
- Enabling/disabling ESP using the G3X Touch AP interface (see also chapter 8.10 in the G3X Touch Pilot’s Guide):
- From the PFD, touch the Autopilot Status box. The Automatic Flight Control System page is displayed.
Or:
From the Main Menu, touch Flight Controls. - Touch the ESP button on the Automatic Flight Control System page to
enable/disable ESP
- From the PFD, touch the Autopilot Status box. The Automatic Flight Control System page is displayed.
- Note that ESP reactivates with every system startup, so you don’t have to be worried about accidentally leaving it off for the next pilot.
- GTN750 – System – GPS Status – SBAS: Make sure all sources are ON
- Inactive GPS sources can lead to AP anomalies
- GTN 750 – System – Setup: Make sure Crossfill is ON
- Otherwise changes you make to the FPL in one device won’t show in the other
- ESP – if you are planning on maneuvering, turn ESP OFF
General familiarization
The avionics in this airplane are pretty intuitive, but a learning curve is unavoidable for everyone. To spare yourself frustration and unwelcome delays using it in-flight it is highly recommended to use the free PC Trainer and/or iPad Trainer to practice use of the GTN 750/650 on the ground, and of course also read the manuals.
There are no software simulators for the G5 units or the autopilot, so reading those manuals is also a must.
Links to all manuals can be found on the cockpit page and in the drop-down menus above.
One of the more demanding tasks is to swiftly handle any curve balls ATC may throw at you to accommodate inbound traffic situations during an IFR approach. This presentation by Bruce Williams is an excellent and easy to understand step-by-step tutorial to try side-by-side on a GTN 750 simulator (see links above).
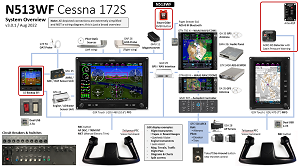
Make sure you understand the main components of this cockpit and their high-level connections (click on below thumbnail to open a large PDF version with hotspots) :
The G5 units offer a shortcut to press and hold the ON/OFF buttons in order to turn them off within 3 seconds instead of 45 – please refrain from doing that as it can get them into a state where they won’t start up after turning on the master switch the next time (if that happens, press and hold the ON/OFF button for some 10+ seconds, and the unit should start up eventually).
Normally you should not have to press the ON/OFF button on the G5 units at all.
Fuel: Please note that the digital fuel gauge on the left side of the cockpit is not connected to the GTN units – therefore, at the beginning of your flight you want to add up the numbers of the two tanks and verify / update them as needed on both GTN screens upon booting up the avionics (right after the GPS database information) for fuel planning purposes.
Course Deviation Indicator (CDI)
The CDI selection differs from the one in a G1000 – tapping the CDI on the G3X will allow you to connect it to either the GTN750 or the GTN650, and the actual CDI source (GPS vs VLOC) is chosen on each GTN device individually. So if e.g. both GTNs are set to GPS then the G3X will offer you GPS1 and GPS2, but not no VLOC (VOR1 / LOC1 or VOR2 / LOC2).
It is recommended to always leave the G3X CDI connected to the GTN750, and switch the CDI on the moving map screen of the latter. Also, always use the External GPS option – that’s the GTNs.
Autopilot
Short introduction:
To properly pre-fly and use the full potential of this AP to your advantage and ease your workload in the cockpit please familiarize yourself with the AFMS and this guide published by Garmin – and of course follow the advice of your CFI.
Even more important than knowing how to use the autopilot before using it is to know how to disconnect / turn it off in case it does something you don’t expect so that you have time to figure out what happened before getting into a dangerous attitude.
NEVER FIGHT AN AUTOPILOT. If it’s not doing what you want – especially vertically -, disengage it and set the airplane up by hand.
The most common way to disconnect the autopilot is to press and release the AP DISC / TRIM INT (AP disconnect/trim interrupt) button located on the control yoke. An autopilot disconnect tone will sound, and an amber AP will be annunciated on the G5 autopilot status box.
Three other ways to disconnect the autopilot include:
- Pressing the AP Key on the GMC 507 Mode Controller
- Operating the Electric Pitch Trim Switch (located on the control wheel)
- Pulling the AP circuit breaker (know where it is in the center of the top circuit breaker panel, marked with a yellow plastic ring to help find and pull it fast)
In the event of unexpected autopilot behavior, press and holding the AP DISC / TRIM INT button will disconnect the autopilot and remove all power to the servos.
Check out below 1hr GFC500 video presentation from Sporty‘s/Garmin – it explains the whole system as well as its use in a flight scenario, including VNAV. (That said, you still always want a CFI next to you as you learn to use the AP!)
Lastly, here is another good article talking about APs in general, definitely worth reading.
ESP
An important AP preflight element for you to think of if you are planning on practicing maneuvers such as steep turns, stalls etc. is to be present to and disable ESP (Electronic Stability & Protection – automatically enabled every time the avionics are starting up), because when it senses that the aircraft is near the defined operating limit in pitch attitude, roll attitude, high airspeed, or low airspeed, this function will automatically engage one or more servos to nudge it back to the nominal operating envelope.
See the Pre-/Postflight section further up on this page for more details.
VNAV
VNAV is fully supported by both the GTN and the AP!
That feature can make your in-flight planning of descents much easier by letting you define the BOD (bottom of descent), i.e. the altitude you want to be at in the not so distant future (e.g. TPA 3nm before an airport), and at what descent rate you’d like to get there (typically a comfi 500 fpm) from where you are, and the system helps you out by giving you a TOD (top of descent) and displaying a VDI that you can conveniently follow just like you’d follow a GS/GP indicator on an approach.
The following video is very useful to help you understand it, and how to set things up in the context of using the GFC500 AP:
Checklists
There is a standard laminated checklist provided by BEFA in the cockpit.
You can also use the electronic version by looking for the Checklists option available from the Main menu on the PFD; in addition you can jump straight to the emergency checklists via the EMERG software button on either of the two G3X Touch displays.
- There are several checklist groups – e.g. EMERGENCY (IN FLIGHT), GROUND and FLIGHT NORMAL PROCEDURES, etc. -, and each of those groups has one or several specific checklists in them.
- You can check (and uncheck) items by pressing the knob on the G3X Touch. Please note that the checklists on the two G3X units are independent, i.e. they’re not in sync.
Engine start
Warm start: Above 100°F oil temperature you typically first want to try starting the engine without priming. If that fails and you think you do need to prime after all, do not over-prime – doing so washes away engine lubrication and causes cylinder wall damage.
Cold start: Priming long enough is as important as adding enough throttle; ½” throttle appears to work better than ¼” when you start – just be ready to reduce the RPM once the engine starts. Also, don’t delay/wait after priming – starting right after priming increases the chance of an instant success, so do the Clear Prop shoutout just before you prime.
NEVER crank an engine longer than ten seconds, NEVER push the START button again right after letting it go, and ALWAYS wait twenty seconds before cranking again.
You can do this up to five times. If it hasn’t started by then, give it 30 minutes to cool down or you risk causing damage.
Weight & Balance
| N513WF | W&B | 1/13/25 | ||
| Weight (lbs) | 1,681 | ||
| CG (in. aft of datum) | 39.92 | ||
| Moment | 67,100.86 |
Compass deviation card (Avionics ON) as of April 2018:
| FOR | |||||
| N | 30 | 60 | E | 120 | 150 |
| STEER | |||||
| 360 | 30 | 59 | 89 | 119 | 149 |
| FOR | |||||
| S | 210 | 240 | W | 300 | 330 |
| STEER | |||||
| 179 | 210 | 240 | 270 | 302 | 330 |
ADS-B In / Bluetooth
This plane is equipped with ADS-B In (Traffic, WX) information to both the GTN units and also available to your EFB app (ForeFlight, Garmin Pilot) via Bluetooth.
To connect:

First time:
Get the GTN750 into Bluetooth pairing mode simply by navigating via HOME > System to the Connext Setup page.
DO NOT CHANGE ANY SETTINGS ON THAT PAGE!
The Bluetooth pairing must be initiated by your portable device – look for N513WF. Pop-ups displayed on the portable device and GTN will be displayed to confirm the pairing.
Next time you fly your device should connect automatically, no need for the above procedure. If it doesn’t go to the Connext Setup page again and tap on Manage Paired Devices; check if your device is listed. If not then pair your device again.
Note: Be sure to use Bluetooth – should you look at WiFi and happen to see a N513WF-MX WiFi network, do not connect to it – the GTN WiFi should neither be on nor used as it’s for database maintenance by authorized persons only, and it will not provide you with any of the ADS-B In information you’re looking for.
Connecting that way will also provide WAAS-accurate GPS location, AHRS info and FPL synchronization between the GTN units and your EFB app.
Connecting Garmin Pilot | Connecting ForeFlight
ICAO Filing
Flight plans now have to be filed in ICAO format which asks for more aircraft equipment and capability details than the good ol’ FAA flight plan.
To help with setting up your flight plans we have created a page (find it in the dropdown menu above under > Equipment) which should do the trick – use those bits and pieces to fill out the aircraft profile in your EFB.
Removable data cards
Never remove any of the data cards from the avionics, especially not while the units are turned on. Any outdated databases on those cards are to be updated by authorized staff only.
Cleaning the displays
Please use the display cleaning cloth in the glove compartment.
The GTN units have displays that are coated with a special anti-reflective coating that is very sensitive to waxes and abrasive cleaners. CLEANERS CONTAINING AMMONIA WILL HARM THE ANTI-REFLECTIVE COATING.
It is very important to only clean the displays using a clean, lint-free cloth and an eyeglass lens cleaner that is specified as safe for anti-reflective coatings.
Headset issues?
If you are having issues with headsets in 3WF, click here for more information.
Wind alert
- During preflight and after flight, whenever you walk around or move the plane with the tow bar please close the doors at least to the first noticeable notch (so that they hold in place) so as to avoid sudden door swings with wind gusts.
- Please always install the control lock on the yoke after every flight. It’s part of the checklist and a required step. It may not be gusty when you come back, but wind conditions can change quickly, and the ailerons and elevator control surfaces need to be protected from sudden movements.